How to Epoxy a Table
An epoxy resin coating can breathe new life into an old table or transform a new wooden piece into a work of art. Whether you’re refinishing a dining table, creating a bar top, or crafting a river table, mastering these steps will help you achieve a bubble-free, mirror-like finish, making your tabletop as clear as amber.
I. Why Choose Epoxy Resin?
- Superior Protection: It’s waterproof, resistant to alcohol and coffee stains, and offers 3x the scratch resistance of lacquer.
- Artistic Versatility: You can embed dried flowers, pigments, or glitter to create custom starry sky or ocean wave effects.
- Lasting Durability: When applied correctly, an epoxy resin tabletop can last 10+ years.
II. Preparation: Tools & Environment
1. Essential Tools Checklist
| Category | Item |
|---|---|
| Resin | High-clarity tabletop epoxy resin (e.g., MAS, Stone Coat) |
| Substrate Prep | 180-400 grit sandpaper, alcohol, wood primer |
| Mixing Tools | Electronic scale (0.1g accuracy), plastic cups, silicone stirring sticks |
| Application Tools | Spreader, foam roller, heat gun/propane torch |
| Safety Gear | Respirator (with organic vapor cartridges), nitrile gloves |
2. Environmental Requirements
- Temperature: 22-25°C (72-77°F) (Lower temperatures make resin thick; higher temperatures can cause bubbles).
- Humidity: <60% (High humidity can lead to “amine blush” or cloudiness).
- Space: Well-ventilated and dust-free. Lightly mist the floor with water beforehand to settle dust.
III. 7-Step Operational Guide
▶ Step 1: Substrate Preparation — The Key to Adhesion!
- Clean and Degrease: Wipe the surface 3 times with alcohol to remove oils and dust (do NOT use a wet cloth!).
- Sand for Adhesion:
- Old Tabletops: Sand off old finish with 180-grit sandpaper, then smooth with 400-grit.
- New Wood: Directly sand with 400-grit, following the wood grain.
- Seal Coat (Crucial!): For porous wood (like oak), apply a thin “seal coat” of resin first. Let it cure for 24 hours to fill pores and prevent air bubbles from escaping later.
▶ Step 2: Resin Mixing — Precision is Core
- Weigh Accurately: Measure Part A and Part B precisely according to the ratio (e.g., 300g Part A + 100g Part B for a 3:1 resin; error ≤ 3%).
- Stir Slowly: Stir at a steady pace of no more than 300 RPM along the sides and bottom of the cup for 5 minutes.
- Rest to Debubble: Let the mixed resin sit for 10 minutes to allow large bubbles to rise and pop naturally.
▶ Step 3: First Coat Application — Sealing the Base
- Pour the resin onto the center of the tabletop and spread it outwards with a spreader.
- Use a foam roller to roll in one direction, ensuring the resin penetrates wood seams (aim for about 0.5mm thickness).
- Edge Treatment: Apply painter’s tape to prevent drips. Scrape off any excess resin dripping over the sides with a spreader.
▶ Step 4: Debubbling — Heat Gun Technique
- Hold a heat gun about 15cm (6 inches) from the surface and quickly sweep it across (2 seconds per area).
- Focus Areas: Pay extra attention to wood seams and areas where resin pools, as these are common bubble hotspots.
▶ Step 5: Flood Coat Pouring — Thickness & Artistic Design
- Wait 24 hours (or until the first coat is tack-free).
- Pour a sufficient amount of resin. Keep the total thickness to 2-3mm (for thicknesses over 3mm, you’ll need to pour in layers).
- Get Creative: This is the layer where you can add color pigments, gold flakes, or glow-in-the-dark powder.
▶ Step 6: Curing — Patience is Key
- Cover the table with a dust cover (a cardboard box or plastic tent works well).
- Curing Times:
- Do not touch within 24 hours (you can trim drips from the edges after 4-6 hours).
- Preliminary hardness after 72 hours.
- Fully cured after 7 days.
▶ Step 7: Polishing — Achieve the Mirror Finish
- Wet Sanding:
- Start with 400-grit sandpaper, then move to 800-grit, then 1500-grit, continuously rinsing with water as you sand.
- Fine Polishing:
- Apply polishing compound and use a wool pad on a rotary polisher (an angle grinder with a polishing pad is more efficient).
IV. Common Problem Solving
| Problem | Cause | Solution |
|---|---|---|
| Surface fish eyes/craters | Oil contamination | Sand off affected layer, clean with alcohol, then re-pour. |
| Localized stickiness/uncured | Inconsistent mixing | Scrape off uncured resin, spot-apply new, properly mixed resin. |
| Edge sagging/drips | Resin too thick | Smooth with a spreader before curing. |
| Tiny residual bubbles | Insufficient debubbling | Pop with a needle, add a drop of UV resin, then cure with a UV light. |
V. Advanced Techniques: Make Your Table Unique
- Embedded Designs: Place dried shells, coins, or circuit boards into the resin when it’s semi-cured (ensure items are completely dry).
- Gradient Ocean Effect: Layer blue, white, and green pigments, then use a heat gun to create natural blends and swirls.
- Glow-in-the-Dark Stars: Mix in phosphorescent powder, which absorbs light by day and glows at night.
VI. Safety Warnings
- Ventilation First: Always work with open windows and fans, and wear a respirator.
- Fire/Explosion Hazard: Keep away from open flames. Resin exothermic reactions can reach 80°C (176°F).
- Skin Protection: If resin gets on skin, wash immediately with soap and water.
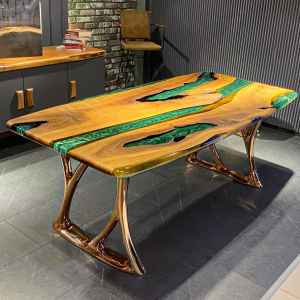
The finished product: A crystal-clear resin layer where wood grain appears suspended in water, with a glass-smooth touch. Daily maintenance simply requires a damp cloth, resisting scratches and yellowing.
Time Estimate: A 1m² (approx. 10 sq ft) tabletop takes about 3 hours of active work plus 3 days of curing. A small nvestment of time for a decade of stunning beauty!